目的・やりたいこと
お客様からRHEL9/Windows2019 混在環境で600GBのファイルサーバでデータを共有したいという希望がありました。
EFSはLinuxのみ対応ということで、そこでFSx for Windows を RHELからSMBでマウントする方法を考え、検証します。
対象となる技術
- FSx for Windows
- mount
参考URL
注意事項
ユーザー名がubuntuになるので、そこに注意して鍵を指定してもなぜか認証エラーに
そこは【AWS】【Ubuntu】Ubuntu 22.04 LTSにSSH接続/ログインできないが役に立ちました。
これはubuntu使う上で要注意事項です。このブログに記載の通り、PowerShellからはSSHログインできるので、その先でPubkeyAcceptedAlgorithmsに+ssh-rsaを追加します。
これで無事Teratermからもログイン成功
Welcome to Ubuntu 22.04.2 LTS (GNU/Linux 5.19.0-1025-aws x86_64)

 * Documentation:  https://help.ubuntu.com
 * Management:     https://landscape.canonical.com
 * Support:        https://ubuntu.com/advantage

  System information as of Tue Sep  5 03:50:14 UTC 2023

  System load:  0.0               Processes:             102
  Usage of /:   20.8% of 7.57GB   Users logged in:       1
  Memory usage: 12%               IPv4 address for eth0: 10.0.20.86
  Swap usage:   0%


Expanded Security Maintenance for Applications is not enabled.

0 updates can be applied immediately.

Enable ESM Apps to receive additional future security updates.
See https://ubuntu.com/esm or run: sudo pro status


The list of available updates is more than a week old.
To check for new updates run: sudo apt update

Last login: Tue Sep  5 03:48:17 2023 from 10.0.5.138
ubuntu@ip-10-0-20-86:~$
ただし、teraterm5系(ベータ)だと、新しめのPubkeyAcceptedAlgorithmsに対応しているのでAL2023やubuntuへのログインOKだったりするそうです。
作業の流れ
事前作業
1.DNSサーバにManaged ADを指定したDHCPオプションセットを作成します。
なお、現在のVPCでは既に以下のデフォルト?のDHCPオプションセットが当たっていました。
2.なのでこれを上記のnozaki-dhcp-setに変更して保存します。
3.ubuntu EC2を立てておきます。AMIは「ubuntu」でコミュニティ検索して出てきた一番上の最新バージョンを選びました。
4.ubuntuにログインし、以下のおまじないを実行
$ sudo apt-get update
$ sudo apt-get -y upgrade
$ sudo apt-get -y install sssd realmd krb5-user samba-common packagekit adcli
5.デフォルトのレルムの入力を求められたら、「NOZAKI.COM」と入力
その他途中でちょくちょく聞かれる、どのサービスをリスタートするか?みたいなのはデフォルトのままでOKだと思う。
6.念のため、デフォルトのkrb5.confをバックアップ
$ cp -p /etc/krb5.conf /etc/krb5.conf_bk
7.krb5.confを以下のように編集
[libdefaults]
        default_realm = NOZAKI.COM
        rdns = false

# The following krb5.conf variables are only for MIT Kerberos.
        kdc_timesync = 1
        ccache_type = 4
        forwardable = true
        proxiable = true

 [realms]
        NOZAKI.COM = {
                kdc = nozaki.com
                default_domain = nozaki.com
        }

[domain_realm]
        .nozaki.com = NOZAKI.COM
        nozaki.com = NOZAKI.COM
8.次のコマンドを使用して、マシンを Active Directory ドメインに参加させます。
ちなみに「admin」は、ドメインに参加する特権を持つアカウント名です。
$ realm join -U admin@NOZAKI.COM NOZAKI.COM
Password for admin@NOZAKI.COM:
 * Installing necessary packages: sssd-tools
これだけだとドメインに参加しました!的なメッセージがなく、不安を感じたので、念のためsssd-toolsを再度入れてみて、realmコマンドも再度実行してみた。
# apt-get -y install sssd-tools
Reading package lists... Done
Building dependency tree... Done
Reading state information... Done
sssd-tools is already the newest version (2.6.3-1ubuntu3.2).
0 upgraded, 0 newly installed, 0 to remove and 3 not upgraded.

# realm join -U admin@NOZAKI.COM NOZAKI.COM
realm: Already joined to this domain
なんだ既にドメインに参加しているらしい。よしよし
9.ユーザーのログイン時にホームディレクトリの作成を許可するには、次のように入力します。
sudo vi /etc/pam.d/common-session
そして「session required pam_unix.so」の後に次の行を追加します。
session required pam_mkhomedir.so skel=/etc/skel/ umask=0022
10.ユーザーが sudo にアクセスできるようにするために、ユーザーの Active Directory グループ名(Domain Users)グループを sudoers ファイルに追加します。それには、/etc/sudoers ファイルを編集して、次の行を追加しました。
%Domain\ Users@EXAMPLE.COM ALL=(ALL:ALL) ALL
Domainの後に入っている「\」はその後のスペースを認識する特殊文字らしい。
11.次のように入力して sshd 構成ファイルを変更します。
sudo vi /etc/ssh/sshd_config
[PasswordAuthentication] を [yes] に変更し、sshd を再起動します。
sudo service sshd restart
12.最後に、ユーザー「admin」を使用して Linux ボックスにログインします。
パスワードを聞かれるので、NOZAKI.COM\adminのパスワードを入れてください。
$ ssh NOZAKI.COM\\admin@10.0.20.86
The authenticity of host '10.0.20.86 (10.0.20.86)' can't be established.
ED25519 key fingerprint is SHA256:xBsK/o9R7YtmFYTpUb/Y9daMXbOcrjqBuUaRNcTFnNY.
This key is not known by any other names
Are you sure you want to continue connecting (yes/no/[fingerprint])? yes
Warning: Permanently added '10.0.20.86' (ED25519) to the list of known hosts.
NOZAKI.COM\admin@10.0.20.86's password:
Creating directory '/home/admin@nozaki.com'.
Welcome to Ubuntu 22.04.3 LTS (GNU/Linux 5.19.0-1025-aws x86_64)

 * Documentation:  https://help.ubuntu.com
 * Management:     https://landscape.canonical.com
 * Support:        https://ubuntu.com/advantage

  System information as of Tue Sep  5 10:03:53 UTC 2023

  System load:  0.080078125       Processes:             116
  Usage of /:   32.4% of 7.57GB   Users logged in:       1
  Memory usage: 22%               IPv4 address for eth0: 10.0.20.86
  Swap usage:   0%


Expanded Security Maintenance for Applications is not enabled.

7 updates can be applied immediately.
To see these additional updates run: apt list --upgradable

Enable ESM Apps to receive additional future security updates.
See https://ubuntu.com/esm or run: sudo pro status


*** System restart required ***

The programs included with the Ubuntu system are free software;
the exact distribution terms for each program are described in the
individual files in /usr/share/doc/*/copyright.

Ubuntu comes with ABSOLUTELY NO WARRANTY, to the extent permitted by
applicable law.

admin@nozaki.com@ip-10-0-20-86:~$
これで現在、Active Directory ユーザーを使用してマシンにログインしています!
13.ログインしたらそのまま次を入力して cifs-utils をインストールします。
admin@nozaki.com@ip-10-0-20-86:~$ sudo -s
[sudo] password for admin@nozaki.com:
root@ip-10-0-20-86:/home/admin@nozaki.com#apt install cifs-utils keyutils
14.adminユーザーとしてマウントするため、adminユーザーのホームディレクトリ内にディレクトリを作成する必要があります。
$ mkdir ~/fsx
15.Kerberos チケットを作成します。
$ kinit
Password for Admin@NOZAKI.COM:
検証手順
1.ファイルシステムをマウントします。
$ sudo mount -t cifs --verbose -o vers=3.0,cache=none,user=$USER,cruid=$USER,sec=krb5,uid=$(id -u),gid=$(id -g),ip=10.0.28.218 "//amznfsxfzajiyia.nozaki.com/share" /home/admin@nozaki.com/fsx/
[sudo] password for admin@nozaki.com:
ip address 10.0.28.218 override specified
mount.cifs kernel mount options: ip=10.0.28.218,unc=\\amznfsxfzajiyia.nozaki.com\share,vers=3.0,cache=none,sec=krb5,uid=96001112,cruid=96001112,gid=96000513,user=admin@nozaki.com,pass=********
「ip=10.0.28.218」はFSxのIPアドレス、「amznfsxfzajiyia.nozaki.com」はFSxのDNS名、「admin@nozaki.com」はADユーザー名です。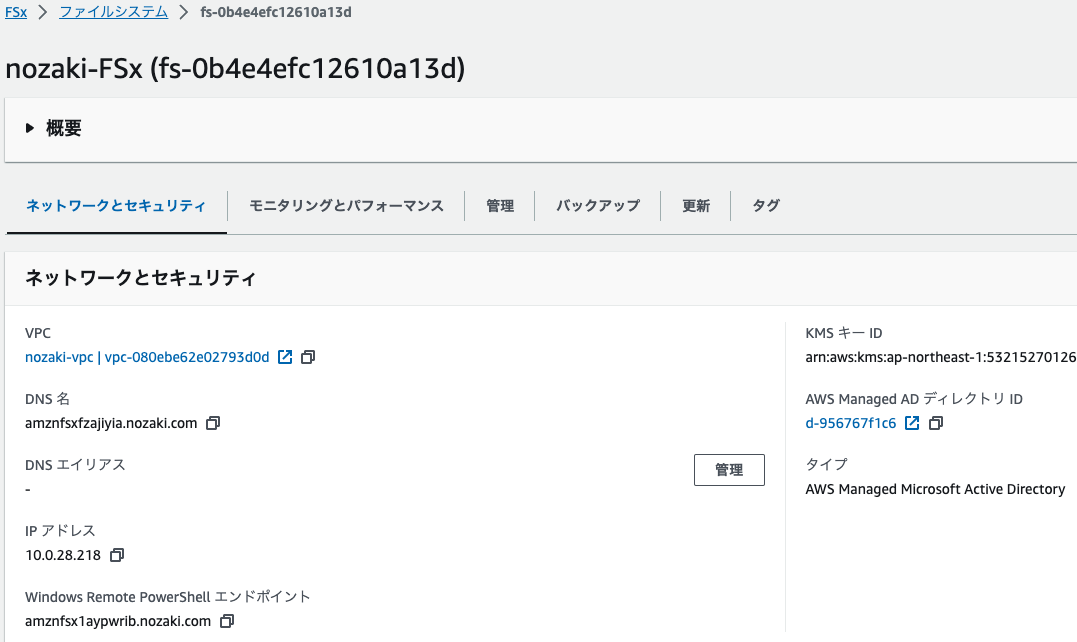
2.mountで該当ディレクトリFSxがマウントされていることを確認
$ mount
〜略〜
//amznfsxfzajiyia.nozaki.com/share on /home/admin@nozaki.com/fsx type cifs (rw,relatime,vers=3.0,sec=krb5,cruid=96001112,cache=none,username=admin@nozaki.com,uid=96001112,noforceuid,gid=96000513,noforcegid,addr=10.0.28.218,file_mode=0755,dir_mode=0755,soft,nounix,serverino,mapposix,rsize=4194304,wsize=4194304,bsize=1048576,echo_interval=60,actimeo=1,user=admin@nozaki.com)
所要時間
1時間